A few things to note:
I have not abandoned this project! Expect a completely re-vamped...everything in about a month!
There will be a related Etsy store for random pieces and related stuff.
...
This project has a name.
For the longest time, I didn't know what to call my project. So, for now, I have decided to call it Project Dresner in honour of Karen Dresner, my lower school science teacher.
Tuesday 23 October 2012
Wednesday 12 September 2012
Some Great Resources
The good thing about all the issues my Mendel has been facing is that I have found some truly great resources for troubleshooting some common issues. I'll be posting these here and on a separate page so that they will be easy to find.
Software/Firmware
Make Something! Printer Firmware
Electronics
Software/Firmware
Make Something! Printer Firmware
Electronics
A Note on Calibration
I know that there are a lot of people out there who dislike the calibration process. This is especially true for people that are using derivatives of printers or have made their own modifications. That being said, anyone who recieves a printer as a perk will have their printer pre-calibrated with the standard values for my particular build. This also goes for those donors who are only recieving the printed parts or the files.
I know it really doesn't seem very important or necessary since the maths involved is pretty simple but it's my way of making everything just a tad easier. That is one of my goals for this project, isn't it? To make this whole process just a tiny bit easier. Also, I'm familiar with technical difficulties in classrooms and, although it is recommend in the materials provided with the printers that calibration methods and formulae be covered simply to round out the build experience, it's one less thing to worry about for whatever reason.
Happy Building!
Monday 10 September 2012
Another Post Office Rant
If anyone was wondering as to why it has been taking me so long to get this project moving up to speed, blame the USPS. Seriously. It is unbelieveable how utterly incompetent my postal office is! On saturday, I finally had had enough of their excuses and bumbling around that I went down there after being essentially challenged to do so by the manager. Here is what I learned:
- He thought my name was Richard despite having spoken to me numerous times on the phone. As someone who knows the LGBTQ community, I understand that with the growing number of trans men and women, you never can be too quick to judge about a person's gender. There is an exception: When someone clearly identifies herself as a woman named Kimberly who lives with a man named Richard, who, by the way, the manager has also spoken to, it would be fairly safe to assume which one I was.
- No one ever files complaints for poor service.With the above said, I was then told that I was the ONLY PERSON to ever file a complaint against this office and the manager who shall remain nameless. This was then followed by the manager saying that he had me confused with at least one other woman and Richard. Um...What? But here I thought I was the ONLY PERSON EVER to have filed a complaint.
- Apparently, people no longer remember what a CD is. Now, don't go saying that a younger person might be more familiar with MP3s. The manager is at least the same age as me and therfore grew up during the age of cassette tapes and CDs (and minidiscs, laser discs...). This came up when I asked why my mail carrier would bend a circuit board and shove it into a teeny tiny apartment mailbox. The manager was unfamiliar with circuit boards and what they felt like so I compared it to roughly the same rigidity of a CD. He still didn't understand why I was upset that someone bent my boards and put it in my mailbox despite the package being labeled as fragile/do not bend and clearly labeled as a stiff envelope containing electronic components.
-More than one person cannot live in an apartment despite there being a history of mail and deliveries being addressed to two people in the apartment. I'm not even going to explain this one because I couldn't even understand what the manager was trying to say or imply with this.
Please don't start flaming be about how the recent budget cuts have affected the postal service. I'm well aware. There is, however, a difference between the affects of a budget cut and plain old laziness and incompetence. In this instance, we are dealing with incompetence and someone who clearly does not care about their job, is utterly clueless about how to do their job (and apparently who their superiors are), and is pretty clueless about things in general if my multiple conversations with this manager are anything to go by. Now, back to our regular posts about fun and educational stuff.
Wednesday 5 September 2012
What to do about fumes
I know a lot of people are concerned about the fumes produced by melted plastics. As I understand it, many people "prefer" the fumes of PLA over ABS. I say "prefer" because it really is a choice about which is less offensive since both are not exactly pleasant fumes, unless you are into that sort of thing. While you will be able to use both PLA and ABS with the printer (simply adjust the settings from ABS to PLA), some people simply cannot deal with the fumes because it makes them sick or just because they don't like it. This is especially true for this project as its intended use is in the classroom where parents may not appreciate having their child exposed to fumes and the potential chemical burn-off associated with melting plastic. So, in an effort to make this project as kid-friendly (especially for people who may want to build this printer as a family project/ science fair project/ class project) I have come up with some ideas how to minimize exposure.
- Place the unit near an opened window (if there is no cross breeze, a fan directed at the window may help with circulation)
- Choose a printer option with a case and affix some piping to the back to lead out a window. (this will probably be an extra option)
- Print in a garage or a room that is not being used (I chose my bedroom with the door closed)
Tuesday 4 September 2012
Some Preliminary Specs
So, while I fiddle with the Mendel and get things ready to build the delta prototype, I thought I should let you all in on some of the preliminary specs. Here are some details to pique your interest:
-Build Envelope: 12.5"x12.5"x12.5"
-Footprint: 14"x16"
-Dimensions: 14"x16"x20"
-Weight: approx. 15 lbs
-Heated Bed: Yes
-Motors: 5 NEMA 17 Stepper Motors
-Electronics: Sanguinololu (standard) or RAMPS (Request)with SD card reader
-Bluetooth: Optional
-Non-Printed Parts: Casing (structural support- Carbon Fiber or Acrylic), Hot End, Motors, Nuts and Bolts, Cabling, Timing Belt (this may change)
Day 35: A lesson learned
As I have mentioned in another post, I purchased my hot end already assembled. Never again will I do this! I encourage everyone to build your own unless you are buying from someone who: a) knows what they are doing; b) are willing to answer any questions you may have about how they built the part; or c) everything is well documented. So far, this one part has had several unknown wiring issues, a broken thermistor (which I literally just found). This would explain why I was not getting any temperature readings off of the hot end. I guess until my pack of thermistors arrive it will be extremely careful printing or no printing at all.
Understandably, I am not happy about this new development at all.
On a more positive note, as far as I can tell, the motors I ordered from DIYTechShop work beautifully.
Understandably, I am not happy about this new development at all.
On a more positive note, as far as I can tell, the motors I ordered from DIYTechShop work beautifully.
Thursday 30 August 2012
A Question from RepRap Forums
Earlier today, I was asked on the RepRap Forums why I wanted to know if anyone had had any success with printed timing belts or something similar. Well, there really is no one major reason as to why I am doing this, there are several: to make things just a bit easier in terms of sourcing the materials, to keep to the philosophy of a getting closer to a completely self replicating machine, to keep costs down, to make it easier to replace, and so on. Pick any reason you want.
I have heard that this particular part is a bit hard to source in some areas so I decided to find some sort of alternative to it. However, this is only something that I am considering. This may change by the time I release my complete design. It all depends on what is the most readily available and what is then the easiest. I have not heard anything to suggest that this is a part that needs to be replaced often so it is not as if there is a desperate need to keep many on hand in case one breaks. I am simply trying to keep my options open.
I have heard that this particular part is a bit hard to source in some areas so I decided to find some sort of alternative to it. However, this is only something that I am considering. This may change by the time I release my complete design. It all depends on what is the most readily available and what is then the easiest. I have not heard anything to suggest that this is a part that needs to be replaced often so it is not as if there is a desperate need to keep many on hand in case one breaks. I am simply trying to keep my options open.
Day 30: Another Draft
In keeping with the promise I made the other day, here is the first draft of the top plate. Again, not sure if I want to have a bolt that will attach the arms or if I want to have the ends of the arm connect to a printed piece. Ultimately, it will come down to what creates the smoothest movement. Right now, I'm leaning towards a smooth rod fitted into each diagonal for the four arms.

Update (5:36 pm): Here's the first draft of one segment of the arms.
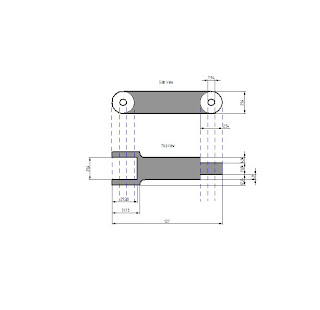

Update (5:36 pm): Here's the first draft of one segment of the arms.

Wednesday 29 August 2012
Day 29: First Drafts and an Update
Okay, so this first draft is pretty awful and incomplete but I promised to post something and I am.

The design is pretty general and looks like every other delta bot out there pretty much. The arms each have two points of articulation for a grand total of 16 printed pieces not including the pulleys that will be attached between the two rods that make up each arm. The extruder carriage is pretty basic as well. This is mostly because I can't decide what kind of attachment I want.
The motor for the extruder may be mounted on the extruder and hot end or it may be mounted to the side. It really depends on the weight of the motor, which, if there are any RepRap forum readers here that have seen my thread, will either be the standard Nema 17s or 23s. Again, this all depends on how much weight the printed arms can handle since I really want to keep this area as light as possible. There are so many options for this that I really won't know what I like for this project until I start building.
This morning, I ordered new motors for my mendel so, hopefully, I can start printing by Monday or Tuesday, depending on when my post arrives and assuming that the motors work.
I have also decided that there will be some lower priced perks:
-Printed parts only- This is for those of you that would like to source your own materials. This includes only the printed parts and fasteners. The price for this will likely be in the $50- $75 range and will account for the cost of printing materials.
- Printed parts files- This will be the lowest option and will be a $25 donation for which you will recieve the .stl files to print out your own parts.
Tuesday 28 August 2012
More crazy updates!
Okay, so, first things first, I have to say, I can never finish a proper mechanical drawing. I have a love hate relationship with them. I love mechanical drawing and surveying (God only knows why) in an archaeological setting. Not so much with the engineering. Why, you ask? I can't draw mechanical parts to save my life. Fashion drawing? Fine. Biological drawings? Pretty passable if given enough time. Anything math or engineering related and I will make your pre-schooler look like Picasso. Ask any of my grad professors who have had to deal with my intensely poor perspective drawings and freehand graphing. It's pretty frightening. My solution? 2D Mechanical drawing software! I'm still trying to get a grip on it and it's features but it has to be better than my poor attempt at sketching out the axis rods for the printer. Hell, I can't even figure out what I meant to draw last night by the picture alone. Thank God for my scribbled notes that weren't smeared with spilled cabernet. I'll be posting the first draft of the framework tonight and possibly the draft of the rod. Why is it taking so long? I can't decide if I should leave the rods unadorned, a la Rostock, ou give them some kind of subtle embellishment.
Also, I haven't been able to start printing because of an issue with my motors. I'll be giving it another shot tonight and if I still am not getting any results, I'll be returning my motors and it'll be another week or so before I can start printing. Disheartening, I know. Either way, at least I'm getting work on this project done.
For anyone that read my previous posts, the sweet little homeless stranger that was brought into my home is still here. She went to the vet on Saturday and everything checked out just fine except that she was still lactating from a litter of kittens she had had fairly recently. She's cranky but a sweet little darling that has been sitting with me while I work on drawings today. However, she seems to think that the cables on the Mendel are for chewing and pouncing. Oh well.
Here's the new software I've been using:
Solid Edge 2D Drafting
Friday 24 August 2012
More setbacks
Well, it looks like it probably wasn't bad stepper drivers but may actually be the motors that just plain don't work. I've tried everything and nothing can get the damn things to turn. I've tried contacting the person who I bought the motors from and am still waiting for their reply. On another note, the hot end that I bought pre-assembled just fell apart on me. It looks like I'll have to disassemble that to replace the thermistor and double check the wiring. I had been wondering why the hot end simply would not heat up and upon emailing the seller, recieved a rather rude response of: trace the wires. Well I guess I never would have thought of that! Because that wasn't the first thing I did when hooking it up to the PCB to begin with.
My frustration with the motor wiring has begun to affect my boyfriend and set him in a horrible mood on more than one occassion. I have the feeling that perhaps I should have just contacted someone with a working printer to print out the parts for me as this is proving to be a ridiculous hassle.
My frustration with the motor wiring has begun to affect my boyfriend and set him in a horrible mood on more than one occassion. I have the feeling that perhaps I should have just contacted someone with a working printer to print out the parts for me as this is proving to be a ridiculous hassle.
Day 24: A much needed break
Okay, I seriously had to take a break from this to get my head sorted. I came away with one really important thing: before going insane and rewiring everything because something doesn't work, check that everything is there. How did I come to this mind-blowing notion? I took a break, stepped back and double checked my mendel only to notice that I had forgotten to put the stepper drivers on the PCB and that was causing my motor issues. It only took nearly a week of Adderall-fueled rage and confusion to figure this out.
So what has happened in the couple of days I took off? Not much except for my significant other's frantic call to me yesterday to say that there was a tiny stray kitty two blocks away that he needed to rescue. Other than that good deed, I have some (really) rough sketches of some of the components for the delta bot. Tonight, I plan to finalize the sketches into something actually resembling parts and not a bracket with a face. Let's wish me luck on my first attempt to create an .stl file!
Here are the part(s) I'll be working on tonight:
- arm segments
- Extruder carriage (although I have seen a number of really nice designs already being used)
I'm really interested in trying to find an adapted, printable version of the timing belt. I've seen this discussed on the RepRap forum and am really interested in people's efforts to get around this part of the machine. So here's my weekend quest: Find a suitable replacement for the timing belt or some sort of adaptation of it. This is tough since you can't really print a timing belt in ABS. Well, you can, but it wouldn't exactly function the way it would normally. I guess it would be more akin to a track than a belt but whatever.
Happy weekend, readers!
Wednesday 22 August 2012
Update: Prototype design teaser
Here's a whole bunch of design teasers to hold everyone over until I can post pictures of the first group of printed pieces:
- It will be a delta robot since I want to offer a large print space.
- Roughly 50-75% of the parts will be printed. <-- This may bring the final cost down if I can find a good supplier of ABS.
- The print envelope will likely be at the very least 8"x12"x 20".
- Electronics will be mounted on the rear of the unit.
Tuesday 21 August 2012
Day 21
After turning to the lovely people on the RepRap forum, I think I have a pretty good idea of where I'm going. Also, the power supply issue of yesterday has been solved thanks to a handy plug I pulled from my HP Desktop printer. Pretty sure that drama was mostly the result of my sitting here staring at wires all day and trying to make things much harder than they had to be.
So here's my plan for today: Start printing, damn it! Other than that, I was able to get down some quick ideas before I completely lost my train of thought while watching Hardcore Pawn and listening to FX's truly ridiculous DVD on TV version of what I'm assuming to be a good movie. If all goes well today, I should have, at the very least, the connecting portions printed for my prototype.
Still no name for my prototype. Hell, Still no name for my project, really. Hmm. Suggestions are greatly appreciated.
I also want to say that with the new school term starting, I probably won't be getting as much time to dedicate to my project as I would like depending on what the workload is like. All this means is that: a) I will be spending equal time between classwork and my project, or b) I'll be spending the same amount of time on my project but with the added time of schoolwork tacked on and kiss sleep goodbye.
Monday 20 August 2012
One step ahead- Upgrades
So, while thinking about this prototype, and how to make it about 20% cooler (If you got that reference, good for you), I've been thinking about what possible upgrades I can include in the future. If, in the process of building the initial prototype a few of them get sucked in, all the better.
- Dual or triple nozzle for adding different colours. I haven't found a nozzle for this yet and seriously, how big would the extruder be if there were three of them? eep!.
- Pellets instead of filament- Really just haven't had the chance to give this a lot of thought, yet.
- recycled material- this has been done by a group of people as an ingenious way of building one of those milk carton rafts.
Day 20: Can we please start printing already?
So, this weekend? Total bust. Instead of working and trying to post a new update about, well, anything, I spent the weekend wondering just how much about differential equations and Natural Language Processing I'd forgotten in the months since I last took any classes and going to exhibits about the Terracotta Warriors and the history of espionage to appease my anthropologist soul.
Today, I am determined to end my confusion about the best( and easiest) power supply for my mendel so that I can finally start printing something. While printing the pieces for my still as yet unnamed prototype is at least a week away, I will be printing replacement Mendel parts if anyone is interested.
After peeking around on the internet at some truly neat delta robots, I'm condisering adding the more fluid(? not sure if that makes any sense to anyone not me) movement of the Delta robots I had seen on Hack A Day. This option also seems to free up a lot of space so that, if you wanted to watch it print, there is a greater viewing area, as well as taking care of some of the clutter that other frames seem to have.
Friday 17 August 2012
Day 15: Some stuff broke
I may have slightly busted up my Prusa Mendel before I could even start printing my prorotype. I guess we'll find out how my duct tape fix-it has helped once I start the printing process on Friday, hopefully. I've gotten a bit sidetracked from designing the parts for my prototype by building the Mendel and looking at cool things to print out (a Batmobile was suggested by SOMEONE) and designing the casing for a robot that was temporarily moth-balled.
So here's what I've been working on: determining the print envelope size, part sourcing, determining the final size including casing.
So here's what I've been working on: determining the print envelope size, part sourcing, determining the final size including casing.
Day 17: Software Issues, Educational packets and Cat Toys
After attempting to install the RepRap Host software with no success, I've gone with ReplicatorG. As not everything is wired and connected yet, I haven't been able to test the printing capabilities of this programme. No biggie, just another delay. Cue the throwing of high heels around my work space. Joy. I've been fiddling around with the software and I've pretty much decided that this will be the software I will include with the kits. Of course, you don't have to use it but until I come across something I like more, I'll be using ReplicatorG.
I've begun outlining what will be included in the educational packs that come with the classroom kits. Besides the obvious assembly manual, I will also include a list of recent articles about 3D printing and what it's being used for (Legally I cannot distribute the actual articles without permission from the author(s). If I manage to get their permission, I will include the acutal article and not just a link.), worksheets on electrical componenets and how they are being used in the machine, ideas on how the printer can be used to supplement traditional learning, and some other items. I will also be giving you the option of having the materials on a thumbdrive or in print. The default, for environmental reasons, will be a digital copy.
On a completely, although still slightly related note, my cats, Jack and Peanut, have decided that the print bed is a delightful place to lay their heads and that timing belts make excellent chew toys.
Wednesday 15 August 2012
Who Doesn't Love Free Stuff? or Pay It Forward
Sorry it's taken me so long to finally get around to posting this.
The whole mission of this project is to encourage hands-on learning and creativity. That being said, what could be a better way of promoting the this idea than by giving away a few free printers?
Here's the catch: I will only be giving units to teachers who are nominated since this is primarily an education project. You can nominate yourself or a friend or a well deserving teacher. Depending on how many people are nominated and how many units are purchased through donations, I will determine how many free printers are given away. The cost to produce these free units is included in all (except the basic model) donations. So, the more units people buy, the more I will be donating. Of course, not everyone nominated will recieve a unit. The winners of the free units will be chosen based on why you think they (or you, if you are nominating yourself)deserve a 3d printing kit. Just leave a comment with the individual's name, school they teach at, and your reason why. I'll be choosing the recipients sometime in October.
What will you recieve? I haven't made a final decision as this will also be determined by how well funded this project is so let everyone know about it! It will most likely be a mid-range version of the classroom kits with a laser scanner and a full complement of teaching materials.
Monday 13 August 2012
Day 13: Radio Shack saves the day?
Many people know of my grudge-filled love/hate relationship with Radio Shack. I like that there is one a block and a half from my apartment but I hate their selection, the general ignornance of the products they carry and their uber-inflated prices. For example: I needed 80-something IR LEDS, they charge $2.19 for ONE IR LED. Seriously. I found a 100 pack on another website, for under $5. I know, right?
Another example: I walk in for a desoldering vaccuum the other day and the sales person asks me if I knew what it was for when my entire purchase was soldering accessories. Granted, not the worst experience but every time I go in there I get questioned about whether or not I know what hte products I am purchasing are. And it's always the same sales person. Maybe it's because I'm a woman and the last time I was in the store I was talking to another sales person about the plight of finding a good (ie. space saving yet still roomy enough to pack full of goodies) computer case for a decent price and this guy started questioning whether or not I acutally knew what I was talking about.
But i digress, I left with a happy little haul of a new desoldering vaccuum, soldering tip, and a new usb cable (mine are always vanishing) only to realise that, in a Benadryl fueled haze, I had melted the little prongs off of my FTDI chip. Joy. Now I have to desolder the sucker, buy a new chip, clean up the board and solder the new chip. I had purchased an extra Sanguinololu board to build and then resell but I guess that one might not be sold as quickly as I had hoped but will get a very thorough testing.
EDIT:In my rush to get my stuff, I overlooked the desoldering vaccuum below which is even better priced (I paid $14.99 for mine) than the one I had bought.
Wednesday 8 August 2012
Day 8: Adventures With a Hand Saw
Work Done: Frame cut.
So, after yesterday's delightful adventure into Home Depot to pick up the rods for the framework, I began the slow task of cutting the rods into the necessary lengths. I decided to use the Prusa Mendel as a sort of scaffolding while I build the rail framework around it.
A hacksaw and jigsaw combo took care of cutting the rods with a fair amount of work, my happy luck pretty much ended here as I realised I had bought metric nuts with SAE threaded rods. This realization only came after trying to screw the wrong sized nut onto the threaded rods for a good few minutes. So now I am forced to go and hunt down nuts of the right threading. Thankfully, this is only a minor setback.
On a surprising note, the ABS filament that I had ordered from Taiwan and was deemed undeliverable suddenly arrived are my door this morning! YAY! I had hoped that I might get this thing up and running by the end of the week so that I could print out the first set of parts for my prototype and it looks like it might actually be going that way. I also recieved three other packages today with the hot end, soldering stand, and the pack of nuts. It feels like my birthday. Maybe I just need some sleep.
Monday 6 August 2012
Day 6: Cuticle Clippers Can Be Your Best Friend
Work Done: Soldering the controller
After spending the weekend relaxing and cursing the post office for their utter ineptitude, I recieved 3 more parcels today containing the heated print bed, timing belts, and printed plastic parts. Things are starting to come together but I've been pretty much forced to order everything I need instead of just heading over to home depotso that I can have everything arrive at the same time and not have to worry about tracking down a package without a tracking number or a notice of attempted delivery slip.
Today's work consisted mostly of soldering the Sanguinololu together. I had ordered the complete kit with the FTDI soldered but instead recieved it unsoldered. Oh well. Not a bit deal but I really forgot how badly my eyesight is and am now being plagued by wicked eye strain. Nothing I haven't dealt with before but I may have used said eye strain as reasoning to buy a very well-priced magnifying glass/soldering pen holder. I seem to have also forgot that taking off my glasses to solder the FTDI chip does not, in fact, make my near-sighted ass see the areas to be soldered easier. This led to a truly hideous row of joints around the chip and a misplaced resistor (This can be seen in the photo below). It seems a trip to the wretched Radio Shack is in order.

Also, I'm considering adding the donation of a couple printing units to deserving teachers instead of just one teacher. This will undoubtedly affect my budget and therefore the goal amount for this project.
Friday 3 August 2012
Options
While I have yet to set final price points, here are the tentative donation amounts and the perks that go with them!
~$50-$100 - These amounts don't have perks as of yet. What it is is a $100 donation towards a printer that I will be donating to a deserving teacher or school. If you would like to nominate someone to be the recipient, please let me know why you think they deserve to recieve a free unit and how it might make their job a bit easier. ~$250 - The Class Project: Included is everything you need to get set up: An unassembled (this includes the electronics which you will recieve unsoldered) kit with everything you need to build your opensource printer. Also included are worksheets, diagrams, software options and instruction manual on a thumb drive. Shipping is not included.
~$350 - Deluxe Class Package- Everything from the basic package except the electronics will come to you pre-soldered and you will recieve a spool of ABS filament. Shipping is not included.
~$600 - Premium Classroom Model- This has everything you need: 2kg Filament, pre-soldered electronics, class materials, a larger print bed, 3D laser scanner, and acrylic casing.
~$800 - Premium Model (Aseembled)- Note: The increase in price has to do with the cost of shipping the finished product to you. This includes everything from the premium modeled but you will recieve it pre-assembled and ready for use.
~$1200- The Ultimate Perk- Light and tough, this model includes everything found in the previous models except that it has a casing of 2mm thick carbon fibre and will arrive mostly assembled (The plates for the casing will be laid flat and wrapped to preserve their high gloss finish and the top portion of the frame will be left off to make shipping easier). The frame will either be of carbon fibre or of aluminum. I anticipate that this model will also come with bluetooth and a second print bed for larger projects.
This information is likely to change as I come across parts and make final adjustments to the kits. I will likely be posting a detailed expense list in the next couple of days. Also, I have decided that I will be listing this project on Indiegogo instead of kickstarter simply to get this project in motion and not have to worry about it not making the fundraising goal.
Inspiration and Why pt 1
A quick note about the inspiration behind this project: About a year or so ago, my all time favourite science teacher passed away suddenly. She had been my teacher for a good portion of elementary school and she always made a point of making class fun. This was the teacher that got me into science and truly was one of the best teachers I've ever had. This project was, in part, inspired by her classes and getting back to the incredible amount of fun my classmates and I had in her classes. I was also inspired by the efforts of STEM Education Coalition and their support of science and math teachers and the severe budget cuts these subjects are facing.
How many schools (elementary through high school, not college, though I'm sure this applies to many colleges as well) have it in their budget to bring in a 3D printer that costs tens of thousands of dollars just so a teacher (or student) could print out a model of something? Sure, he or she could just go to the store or go online and buy something similar that might fit their needs or have a model made at a facility that does rapid prototyping, but wouldn't it be easier to just do it in the classroom for a couple of bucks? Here, I'm mostly thinking of science fairs and class projects where you might want to show how an amoeba functions or visualizing air patterns. Sure you can go with clay models and a lot of models are available on teacher supply websites (or Amazon)but wouldn't it be more fun, and customizeable, to just spit out a plastic model yourself?
In keeping with this train of thought, what would be a better way to teach students about machines and their construction than by actually building something of use and learning how each part contributes to the overall functioning of a machine? Initially, this was my main goal, to provide a fairly low cost DIY printer kit and some worksheets so that older elementary school and young middle school students could learn the basics of engineering. However, this then blossomed into a project with numerous applications and various goals depending on donation amounts.
Delivery updates
After a delightful time scolding the awful people at my local post office about actually ringing the doorbell to delivery a parcel, I just recieved the NEMA 17 motors that I ordered a couple of days ago along with the extruder. Progress!
I'm expecting more deliveries in the next couple of days and hopefully I will be recieving them on time and not this poor excuse for a delivery service that has been the cause of much frustration and aggravation.
On a side note, it's Friday? When did that happen?
I'm expecting more deliveries in the next couple of days and hopefully I will be recieving them on time and not this poor excuse for a delivery service that has been the cause of much frustration and aggravation.
On a side note, it's Friday? When did that happen?
Thursday 2 August 2012
Day 2
The materials have started arriving and my dining table is now a delightfully cramped little work station. The only delay right now seems to be that two of the packages are being shipped to my parents' house so it'll be a couple of days before I go and pick them up (maybe). The other delay is that the shipping estimate for the ABS filament order I placed is as the end of the month which means that I get to order another spool! There goes another $30-$40 bucks but at least I'll have two colours to choose from.
So far, the frame design has come to a slight halt as I'm trying to figure out a design that will allow the print bed to be expanded to a larger size as needed but still fit inside the casing. This isn't really any kind of an issue except an aesthetic one and an extremely minor one at that. I guess I'm just nitpicking. Once I've finished the design for the frame and added it to the CAD file, I'll probably post a preliminary image before I really get down to it and finalize the design in about a week or so.
I'll be using smooth and threaded rods for the fram as many other models out there use except I'm considering using aluminum rails in the future to keep the weight down and to avoid extra clutter in the casing. Why am I so hung up on the casing and everything needing to fit? Because I have two very nosy little kitties. I'm not the only one out there with pets or kids so the need to keep everything neatly enclosed (for the most part)and keep moving parts out of reach is somewhere on the list of priorities for this project for me.
Expenses
Seeing as cost is a major part of my project, sourcing materials has becomean exercise in patience and careful Googling. There are two reasons for wanting to keep the overall cost of productions down:
1. To offer each unit at an afforable price and,
2. to meet the $250 maximum cost per 400 units as required by the Desktop Factory Competition.
For the "premium" prototype, the competition requirements haven't really influenced the design of the premium prototype as much as it has influenced the design of the basic prototype. So far, there are two things keeping the cost at below $250:
- The hot end
- the controller
It seems that ~$50 is what I'm looking at for the controller but hopefully the prospect of a bulk purchase might lower that price point a bit.
Bottom line: The price point for the most basic model that I'll be offering is $250. Whether or not shipping is included in this has yet to be determined. There is a small chance that this may change and if it does, I'll post any changes to the price.
Wednesday 1 August 2012
Project Background aka For Science!
Part of the inspiration for actually putting this project into motion was the desire to have a 3D printer of my own but for a more reasonable price than what is currently available. Granted, at this point, anything resembling a budget has sort of been thrown out the window in favour of actually getting the damn thing assembled and modified as quickly as possible. The other part had a lot to do with seeing where US schools ranked in Math and Science coupled with the limited budget that a lot of teachers in the US are faced with.
I have a friend who is a NY teacher (thankfully unaffected by this so called war on teachers we have going on in the Empire state) who spends a good portion of her salary on supplies for her class. She'd been thinking about projects to do during the upcoming school year and I was thinking how to actually put some of those engineering classes to good use. The end result of this was a 3D printer that could be easily afforded on a teacher's salary and used as a class project to teach some of the basics of mechanics to students. This is, of course, in addition to whatever could be printed as a teaching aid (I suggested the parts of a cell, she suggested a globe or something).
However, there was still the cost of the ABS or PLA filament that is used to create the models. This can often reach over $40 for a kilogram. My solution, use plastic pellets. They are much cheaper ( prices for the same weight can sometimes be as low as $5) and, if you have the necessary materials, can be custom coloured. This also led to the idea that in a future model, recycled plastics might be used as well as commercially available pellets thereby making the printing even cheaper.
Here's the bottom line: The end result of this is a printer that is going to be affordable, easily assembled, stylish, and, because it'll be running on open source software (at least for the time being), easy to use. There are some bonuses that I've thrown in but those will have to wait until a little closer to the end of the month, just before the Kickstarter page goes live.
Day 1
Work Done: Casing designs
For a free product, Google Sketchup is doing a good job of letting me design a casing for the printer. I wanted to get this step out of the way since I'm still waiting for my massive haul of electronics and parts to arrive from various corners of the world. So, it might not be the slickest of CAD drawings but the first casing concept doesn't look too awful. I'll finish cleaning it up a bit whenever I get a chance and fine tuning the design as my parts arrive, my mood changes, whatever. Here's the concept for the casing:
 I'm working on a slightly differnt casing design as well that I'm pretty sure is the result of staring at cars and reading car magazines for a good portion of the day and listening to a mix of club music and who knows what else.

It begins...
I blame everything that happens from here on out on being unemployed too long and a love for shiny things. There are other things involved as well but really, being in an apartment with two crazy kitties and not much to do besides stare at Career Builder all day hoping for an Anthropology related job to come up were top contributors to this fairly crazy undertaking.
My crazy idea: 3D printing. Yeah, it's a hot topic among DIY-ers right now and pretty much everyone is selling some version of the same thing so I figured I'd jump on the bandwagon and maybe do a little community service in the process. Or something like that, anyway.
Since this project's kickstarter page hasn't gone live yet, I won't be posting any of the exact specs just yet. What I will divulge is that the premium model that I'll be offering to those donating higher amounts is clad in carbon fibre and has two choices in print bed size with a possible third option in the future and, I'm hoping, will eventually be able to use recycled material.
Subscribe to:
Posts (Atom)